Wednesday, 25 March 2015

Life Drawing - Session 19, 20 & 21

In our nineteenth life drawing session, we started off with the usual five minute sketches and then onto the longer poses with different techniques and also applying whatever we enjoyed the most. Recently I got back into using my watercolours and played around with water density and how much I removed from the brush when placing it onto the paper. Something I would always struggle with back in school was trying to make the different colours not bleed into one another. As I have a better understanding now of how to apply the paints, I can make broader strokes and place greater value where I would have been nervous to before.


For our twentieth session, we started by creating many one minute sketches. After this we had the opportunity to use any medium we liked. I decided on using compressed charcoal and bring out the harsh contrasts of lighting. Next we had to study foreshortening. I had known about rendering depth and distance for several years but did not know that that was the term given to the unusual angles. Furthermore, I really enjoyed pushing myself with this as we only had fifteen minutes on each piece.


In our very last life drawing session on the course, we could use any technique we wanted and play around with colour. At first I tried compressed charcoal again but did not quite get along with it as I thought I would. This was mainly due to the model having fair hair; making the harsh strokes stand out too much. Following this, I used three felt tips (red, orange and yellow) and also my fine liner pens that I thought came out well. I had planned on using an easel at some point for the final piece which we had to do foreshortening on. Unfortunately, I just used a board and table which made the proportions, from which the angle I was working at, come out wrong.


Below is one of my favourite pieces not only in the twenty-first session but out of almost every single one! We had about a quarter of an hour to sketch either the face, hands or feet of the model. I chose the hands as I really liked the angle and peacefulness in the light; making this composition. I placed the charcoal lightly across the page creating a light outline that I then put shading onto. If I could have spent a bit more time on it, I would have added some context in such as a solid black background. Overall life drawing has been an amazing part of the course that has both challenged me and given me experience for the future.


Saturday, 14 March 2015

Photoshop Session - Anthropomorphic Character Design

In our last morning session we studied anthropomorphism. This is very similar to personification, in which a living creature or natural element is presented in a human form; with several recognisable physical traits such as a torso and limbs. We were then asked to create this in the form of a frog. Below is my quick reference image guide. I planned to include clothing but as we were limited to only the time in the session, I stuck with just the bare body.


Here is my final anthropomorphic character. I decided to make an accurate-ish construct of a male body crouching with a thoughtful posture. I mainly used toning references from the top left hand corner image (reference guide above) of a rainforest frog which has some amazing contrasts of colour on it. Overall, I really enjoyed mixing brushes around on thing like the eyes and hope to do something similar in the later.


Thursday, 12 March 2015

Maya Session - Texturing in Viewport 2.0

In one of our morning sessions, we followed a tutorial from a 3dtotal article. Using an alley model supplied to us, we looked into Viewport 2.0 and DirectX which allowed us to see advanced lighting and shading on objects in real time; like they would appear in-game.


Above and below is my progress in the overall texturing in Maya. By placing DirectX 11 shaders into the scene's objects, we could place texture images over a .psd file template (in Photoshop) and save it as a .tga file. After completing this lengthy but enjoyable task, it was just a matter of adding in the file to the shaders.


Underneath is the drain pipe template we used to texture (and the image I used for it to the right). This was one of the hardest forms to make as the surface was curved. On the other hand, the barrel was somewhat easier as the unwrapped template was level.


Some faces of the textures had to be manipulated using the UV Texture Editor. Here I rotated the lid of the barrel with the flowing planks of wood, following the side panels as it would in reality. I quite enjoyed matching up the structure such as the arch above the window integrated in the wall texture.


Below is the final screenshot from the session model. If I could have spent a bit more time on it, I would of added more grime and weathering to the object's template textures. However, I definitely will look forward to using this technique again in the future.


Saturday, 7 March 2015

Maya Session - Simplified T-Rex: Constructing & Unwrapping UV's

In the last several afternoon sessions on Maya, we learnt how to work from a simple box model, shape, extrude and scale it into an organic form; such as a Tyrannosaurus Rex which we constructed. Below is the first design stage. I spent about an hour or two creating the body and then a further fifteen minutes on the left arm and leg. Using the mirror options in Maya, the symmetrical body can be created on just one side and then mirror 'flipped' to the opposite side. In addition, there is a feature which allows you to do this but work in real time mirroring; acting at the same time as you control the mouse.


At first I followed along with the plan image that was handed to us. However, without sounding impolite, the sketched image was slightly inaccurate (as far as we know of the physique of the carnivore). From being a massive enthusiast of dinosaurs growing up, I have collective knowledge of the form of the body which came in really useful for time management building the shape.


Above you can see I shaped the box into the head at first and then worked my way down along the body extruding. Underneath is the basic body build. I found that using the hotkey bar was really helpful for getting to some features faster as well as the shortcut on the keyboard 'g' which repeats the last command.


Here I deleted the flat bottom face from the hip to extrude the leg cleanly down. Once I had reached to the heel, I then filled the hole and formed the claws. Similarly, I did this with the arms but bent them round constructing the forearms and talons.


By the end of the session, I checked all of the perspective views and saw that the front angle was completely out of proportion. The shape of the T-Rex was actually really lean and streamlined for hunting. To amend this, I pulled on certain vertex's to align the head and hips etc. to that of several reference images on Google.


With the basic body created, I decided to add some teeth in. I did this by creating a square-based pyramid, duplicating it and then placing them at different angles flowing with the mouth which came out alright.


Underneath is the first complete design stage. I found it very simple to work from just a box and structure the model. 


In the second and third sessions, we were given a finished model to follow the smoothing process and then for UV unwrapping.


Above is the smoothing process which was very straightforward; after highlighting and selecting the entire model. This basically adds more polygons into the ones already formed and curves out the shape even more. 


Here are the claws and limbs which look a lot more life-like with the smoothing action applied. I turned on 'see wire mesh' at the start which I think really helps inform you where the faces are flowing on the models.


The final stage in the modelling, to make it ready for texturing, was unwrapping the UV's. In the image above and below is the process, selecting the items, isolating the segments (such as the legs, torso and tail etc.), to highlighting the parts and finally 'unfolding' them. This can be seen in the UV Texture Editor like the T-Rex has been skinned and flattened out.


This task was slightly time consuming as selecting certain areas did not work for me but I managed to complete the UV's and by clicking on a certain setting in the UV editor, the best projection layout was made.


Below is the complete handed out model unwrapped and ready for texturing. Although I think this took longer than it should have over the three sessions, I have learned several new techniques for better time management which will most certainly help for the future.


Friday, 6 March 2015

Photoshop Session - Paint Over Tutorial

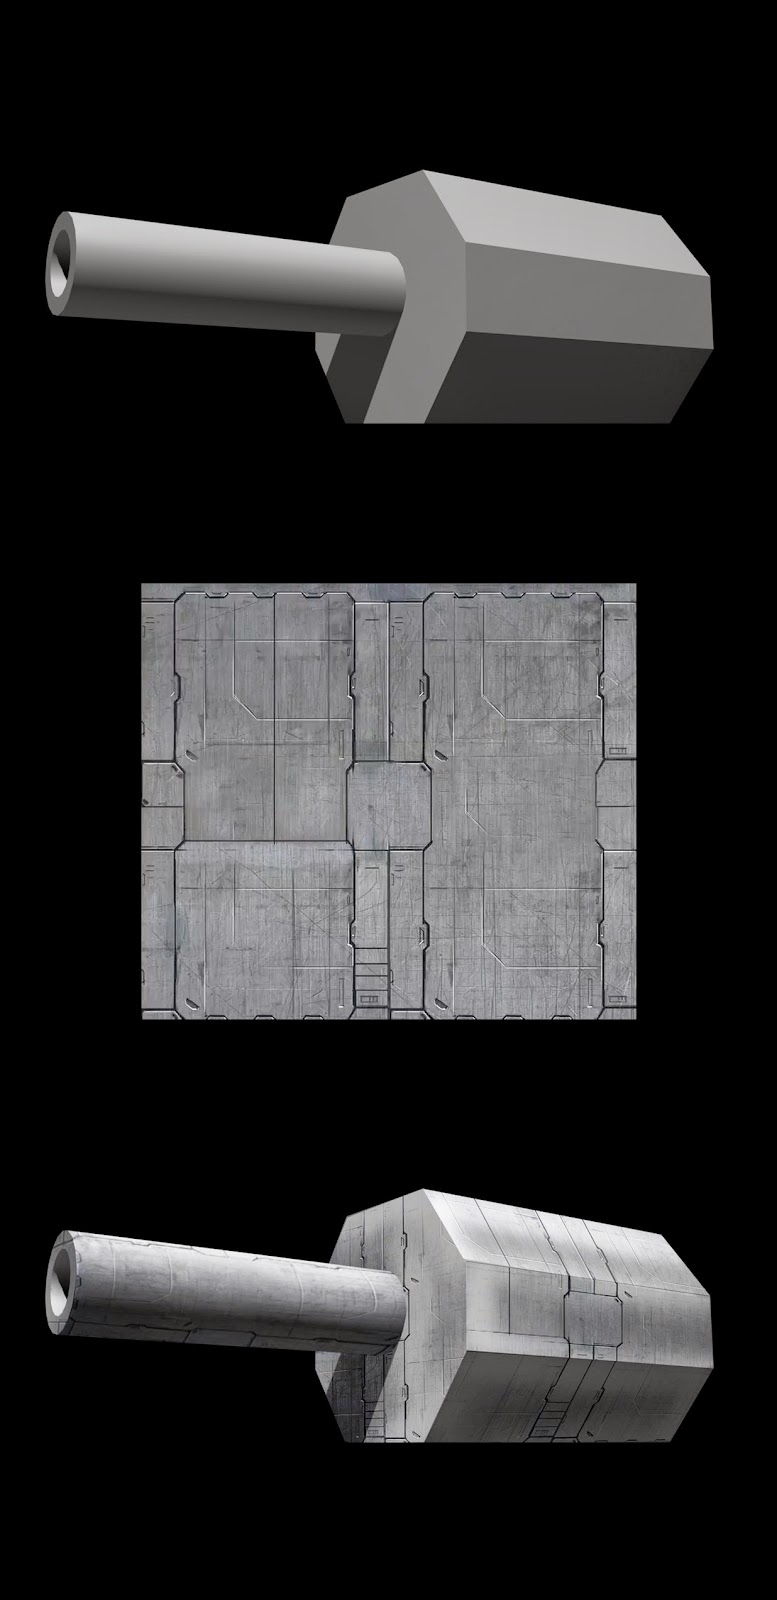
In a previous session in February, we learned about painting over rendered 3D objects by using Photoshop and placing textures over them. Firstly, we were given a simple gun turret image with a metal plate texture. Secondly, using Photoshop's transforms, we manipulated the image over the top of the model by selecting areas with the polygonal tool. Thirdly, we then wrapped it over the surface using tools such as warp and perspective. In addition, I folded the 'face' of the barrel with the warp tool bit by bit to get a smooth curvature. Lastly, it was just a matter of finding the best blending mode to make it translucent onto the hard surface; with 'overlay' working best in the end. 


After we had finished the gun model, there was a somewhat more complex Vampire image that we could play around with and place our own images over. I decided to go for an elephant texture which worked out quite well in the end. I painted over this using the blending mode 'colour' to get the purple and yellow skin tone. Furthermore, I added some detailed features like claw marks to bring the static image to life. This procedure of layering elements is almost limitless and really useful for quick concept work. I will definitely be using more of the technique in the future!


Thursday, 5 March 2015

Visual Arts and Animation - Steampunk Assignment

Another two-week homework assignment was set again; this time to design a Steampunk concept. From looking at a lot of images of the retro mash-up genre, there is a slight cheap feel to it. One reason for this could be that it's mainly a fan-made driven genre. Unlike strapping cogs on a gun and calling it Steampunk, I spent a lot of time trying to work out systems and machinery that would both be practical and useful.


Above is my research and inspiration images that helped me towards my final piece. There was also a wide variety on DeviantArt gallery that was useful in deciding what route to take between a character, vehicle or device/machine concept. Below are my designs ranging from a penny farthing train, a voltage powered musket and a steam powered body support rig.


I decided to go with my steam powered support rig in the end. I really liked the idea of switching the distinctive industrial revolution Steampunk work and have a western American character. In addition, I gave the character retro-futuristic inventions (a common theme in Steampunk) like a wireless Morse code communicator and a metal exo-suit giving the bounty hunter advanced support and strength.


Underneath is my final digital piece. I decided to try and use only three different brushes to get a blotchy tone and make an atmospheric feel to the heat of the sun on the great deserts of western America. Overall I spent ten hours on my final image. One of the main challenges to 2D art, in my opinion, is a consistent path of light to shade which I think I just got away with. On the other hand, I really enjoyed making the distant mirage on the horizon; mainly because I have never painted one before!


Wednesday, 4 March 2015

Life Drawing - Session 15, 16, 17 & 18

For our fifteenth life drawing session, we used a variety of mediums and could finally use colour! I mainly focused on drawing depth that stands out in things like the curvatures of the body. We first started off with quick four minute sketches, using charcoal and then moved onto longer quarter of an hour pieces. I decided to use an easel for this session, instead of on a table, as I wanted to get things in proportion; as it's quite difficult to balance an A2 piece of paper. For the colour piece, I used my Stablio coloured fine-liners. This was interesting to play around with and experiment with a cross-hatching effect.


In the sixteenth session, we explored form and shape of the model spending more time on each piece and really studying structure. We were then given the challenge of doing one minute sketches. At first I thought I was going to find it very strenuous, as I put a lot of detail in my work but I actually quite enjoyed the freedom and aimed at showing the most vivid shape 'paths' as seen in the bottom left hand corner of the image below. 


Our seventeenth session was pleasant; getting to use colour once more! We started off doing one minute swift sketches of the model and then changed onto coloured pens. I used a very fascinating black three-point pen which gave off the illusion as though I had made the same mark with a small distance in between. Furthermore, I used this as an advantage and created a cross-hatched piece. Towards the end I used a purple and pink pen, finding rough markings to shape the models position.


For our eighteenth life drawing session, we tried out negative lighting work by marking charcoal across the paper, creating a dark background and then using a rubber to erase out parts of the body which had the brightest tones. I enjoyed doing this again although we had less time on it then our last. In addition, we tried out the one minute quick sketches and I also brought my watercolours to have a go with blending contrasts.