As part of our Games Encounters unit, we had to create our own Opening Sequence to a Game for the Winter (Formative) Submission. This was to be created in a 'grey box' basic design using the Unity Game Engine. At first I had no idea what I was going to create and it was only after a journey on a train that I began to create a concept and develop from there. I then started to generate ideas and create a rough layout in my head of the map. Furthermore, on a trip to Aldershot from Farnham, I took several images (as seen below) around the train stations which then became my resource for visual construction and building.

I then brainstormed the layout of the start and end position of the character as it was for a first person game. As we begun scripting and learning more in generating animation and functions in Unity (in our Games Encounters Sessions), I planned where things like triggered events could take place, title cards/text appear and in-explorable areas. Below is my final aerial map of my Game with the central events listed to the right.
As I had my general construction of events, I decided to make a three-quarter view plan showing the level in a principle manner below. I also included a perspective plan which let me configure the scale of the town with the players 'eye view'.
With everything organised, I could begin modelling. I decide to do a vast amount of building in the editing software Maya, as I had more freedom with creating the town layout. Below is a phone box's interior which was one of the first intricate details I looked into making. In addition, it is the first object in chronology of the scripted events.
As I developed along with the construction of the phone booth I realised that the phone would need to be detached from the holder in order to realistically represent a phone tone sound placement. I used several tools to achieve this, including the polygonal bend shape tool that worked perfectly for the curve of the cord to the phone.
In my game introduction sequence, a train departs without the player leaving you stranded at the station. I worked out that I only needed to construct part of the locomotive (giving me more time on other items) which is seen through the stations building. I also had to scale several objects into centimetres as I had a greater knowledge working in inches on Maya (from watching several tutorials). This then helped for referencing the human height to other components later on.
Below is my modern Class 450 South West Train complete with a human figure height scale to the left. While making each object that builds to the final product, I made sure that I named and arranged the Hierarchy tab to easily export the objects when they were finally ready for Unity.
After the first train has departed without the player, you explore more of the station looking for a Help Point button. After hearing a strange sound through the device, the player then hears a foghorn and spots a second train, this time an old steam train and carriage arriving at the stations platform.
I spent around six hours modelling this steam train (based off of the famous LNER Peppercorn Class A1 Tornado train) as it's the key focus in the games narrative. As the player can only explore one of the two platforms at the station, I decide on shaping mostly one side of the model saving data and memory for the final layout as mentioned by our lecturer.
Below is the final train model including the carriage with the face normals selected. This was a process I found in later experimentation and improvement but several features to an object can appear visible from only one viewing angle. This can be manipulated in the normals tool but unfortunately you would have to go in and out of Maya and Unity to see the actual difference of the surface change.
As I built my level's buildings and features, I doubled checked that the normals and vertex's were aligned in the correct path rather than having to go back and forth after realising something is wrong with the object in Unity.
After constructing several objects, you can select them in the Hierarchy and then go to normals in the tool panel above and look at them altogether (as seen below) than having to view each object. For some reason my station section was littered with normal errors and delayed my progress by quite a bit.
After making each plane for my levels ground, I would go into an aerial view using the view cube and check that it was accurate with that of my original sketched piece. This way I could not make any mistakes with the layout and confidently build around the areas.
Using the wire mesh on shaded tool allowed me to view the models more clearly together and was a massive help when making the railway tracks; seeing the 'wooden boards' below the lines parallel to each other as the curve of the platform advanced. As the player cannot travel in the non-explorable areas, the tracks beyond the horizon point angle of view, meant I did not have to fully complete the model again saving data and memory overall.
For the streets of the town in my game (I decided to call 'Alderham') I had several elements where I could just mirror cut objects, duplicate and reverse. This was also very practical when it came to things like Lamp Posts as real streets have two dozen or more.
Looking at aspects of creating my environment required quite a bit of spacial awareness within reality which as an artist has been something I have been fairly good at. The car park for example was completely created from the top of my head just thinking about the location in Aldershot. This was the same process with most of the objects in my game, although I did have my own photographs for references.
Although I knew it was not essential, I mapped out my level as though it was an actual street. Adding in items like car reflector bollards, traffic lights and pavement islands. Personally I found this made the game more in-depth and authentic to the concept as a whole.
Once I had finished all of my modelling, I exported all of the objects using FBX files and imported them into a new Unity project. It was very simple to add the layout into Unity; with just a simple drag and drop from the games assets folder, see at the bottom of the image below, into the scene view.
Over the next few sessions in Games Encounters, I learnt many new tools in Unity to enhance my games play-through. For example, I added in a soft 'moon lit' directional light and played around with the settings; something I found was a massive help; just exploring all of the mechanisms and how they worked taught me various skills in editing and my time management.
While at University, I used the suites computers Unity Pro, to expand my games limits; with the free version however there are several features that are disabled and only compatible if you upgrade. I decided to not let this draw me back, although the lighting system was reduced in realism as this was a key feature to give the game its atmosphere.
Additionally, I ticked the box in the system preferences for deferred lighting as several areas in my game flicked by the characters movement. This gave a subtle amount of light emitted over other game objects surfaces but was designed for the final rendering process only in Unity Pro.
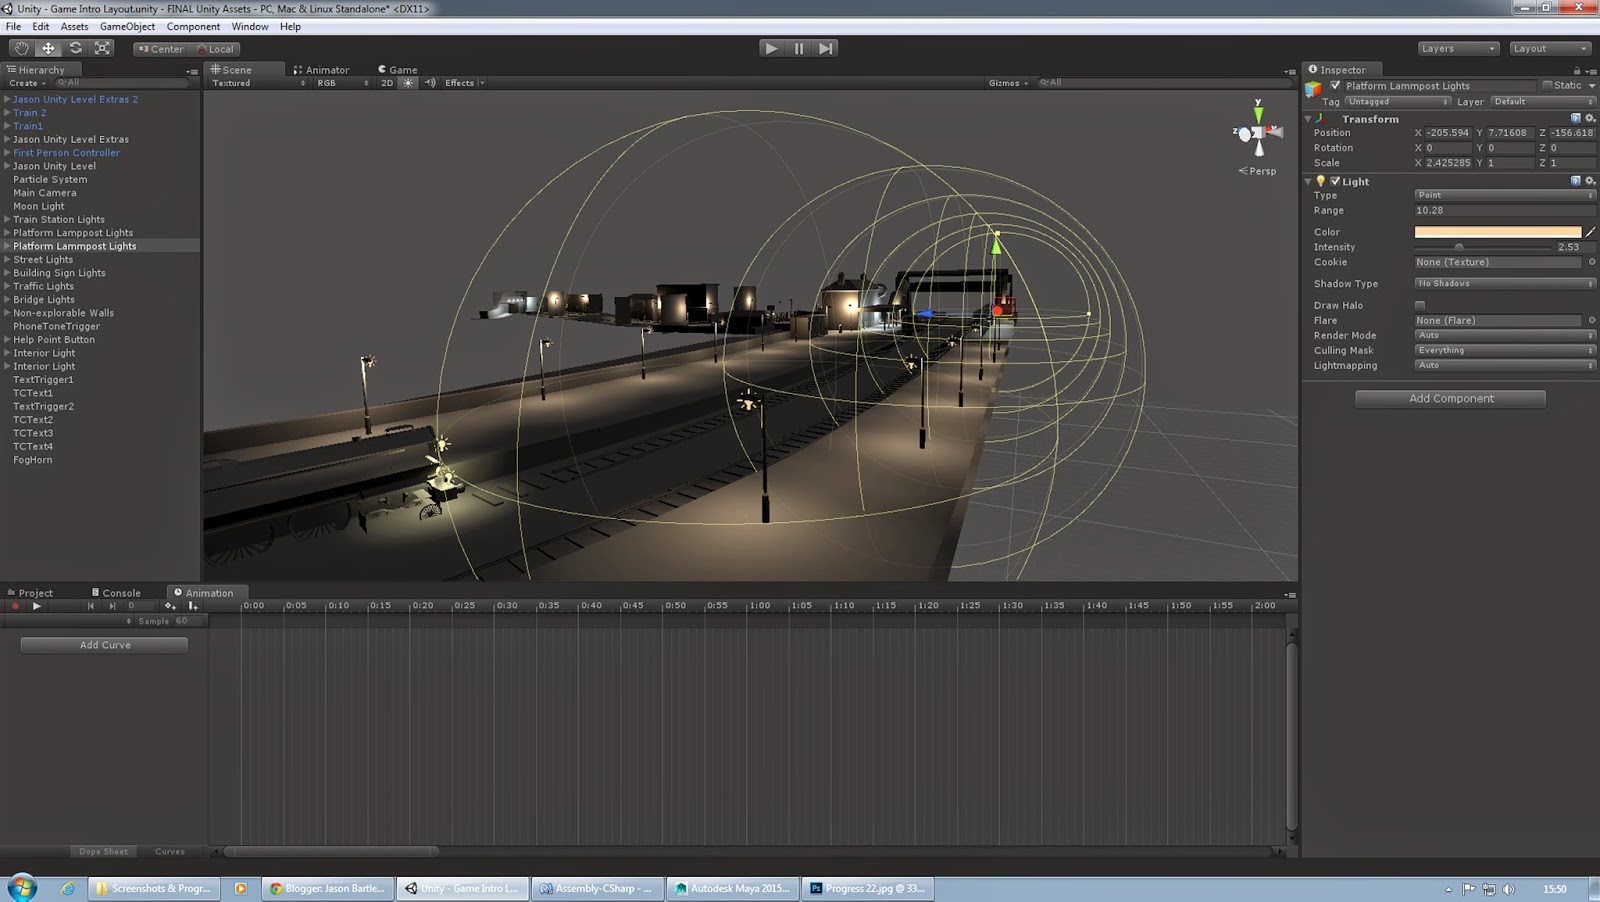
Mixing the lights attributes allowed the mood to change in the game view screen and I went back and forth in the scene view to duplicate several of these. On the other hand, this was a massive advantage, with the lights symbolising the player's path through the level. The brightest man-made florescent whites are at the start and end of the introduction and then in between are a mix of orange lit lamp posts and green illumination for smaller components like the phone booth (as seen below).
After matching all of the lights to the chosen game objects (almost sixty in total) I then went onto looking at sound in my game. As this is the very first game I have ever made, I wanted to impress more with the visuals as well as the sound, as that was part of the submission for 'creating an atmosphere'.
I decided to find sounds online through the website Free Sound that I have also used in college, which is really useful for free material. The only problem was I had to spend many hours to find the best suited sounds for my game. Moreover, things like background ambience were easy to find and download but one of the toughest to search for was the Fog Horn. In my game it is heard as the train arrives at the station; taking about two hours to choose as some are limited by choice, I found what I was looking for. In total my game has eight audio sounds which after downloading, I moved into my assets folder.

A few extra elements I wanted to add in to my level were a night sky and light snow, although they were not essential. Thanks to my classmates, some of who have used Unity before, guided me to find the features called a Skybox and Particle System. These were really useful as they were just what I was after, set functions that could be manipulated in the settings inspector tab to the right. Furthermore, I could change the settings of things like how fast snow would fall, the surface spread area and size of the snow.
Towards our last sessions in Games Encounters, we learnt how to animate objects in Unity, both by using CSharp Scripts with transform selection and by key framing in the points of animation using the timeline as seen above. I needed at least two objects in my game that would be animated which were both my train models.
In all our sessions with Ewan Armstrong, our lecturer for Game Encounters, we learnt how to program code and built up our knowledge over time as it is quite a complicated process of knowing the names of the text that you type out for the computer to make the mechanics work. I really did not want to go anywhere near scripts at the beginning of the term, as I saw it as a really complex component to game making. However, as it is such a crucial part of making a game run, I openly rose to the challenge and watched all the beginner tutorials on the Unity website for scripting with CSharp in the MonoDevelop assembly.
Above is my first scripted code that I managed to create by myself. I felt so ecstatic after making the events happen, which was a phone tone atmosphere sound on loop. With selecting the variables for each part in the script, I could then find where the sound was in the assets folder and drag and drop it into the audio clip area in the Inspector.
As the player would advance through my game, the best way to communicate the story and the chain of events was through a GUI Text game object. This would then notify the players field of view with text. I decided on making the first two GUI Text areas an on trigger enter. So when the player reaches an area for example, like the end of the street ahead, the text would appear only in the trigger zone.
As I proceeded with the scripts, I wanted to create my first train animation. This was perhaps the longest and most time consuming script out of them all, as there was many errors with the placement of animation and its designated variables. Eventually I had to turn to my lecturers help as the problem persisted and I got nowhere; it was just two commands out of place and several updates in the script that had to be swapped around. I was so happy after this and it gave me more enthusiasm to create the next code.
In my level, if the player walks close to the train station, the train on the platform leaves without you. You then walk into the station building itself and are then confronted with another GUI Text, telling you you could try asking at the help point device if any trains are running.
Above is the help point button similar to that of the actual ones at British Train Stations. I decided to put simple material colours over the help point button (the only thing in my game with an added colour over it). This was to help the player identify that that was the button console they have to push in order to trigger the next event.
Above and below are some more images taken from the game view mode. This enabled me to test the game multiple times and I really enjoyed the fluid fluctuation between editing and live play; allowing you to work even faster and critiquing certain things and then tweaking and adapting them.

Below is my final script for my game beginning sequence which has over twenty two stages of events. I remember looking at a procedure in scripting in a session but forgetting its placement for many commands in one code. I also tried to find tutorials on this, although there were many arguments with other methods such as Invoke, Switch statements and enabling and disabling an object. After getting nowhere with the script, I asked for a hand from our lecturer again and he said that the 'wait for seconds' coroutine was best for what I had in mind. Finally, I had to do some more research and figure out the delays I wanted between each parts in the actions but I eventually managed to complete the scripts and finish the entire game intro layout as I had planned. This made me look back at the past two months and made me think how far I have come in learning all of the software's to build my very own game.

After I had completed my game, I exported it using a simple process called 'build'. You can select what platform you want the game to run on and the settings of the selected scenes and as my game only has two minutes of play time it had rendered it within a minute! Below is my Game Intro One Sheet as if I was presenting the game to a studio for approval. I was keen on making this with things like the logo and features, as I have made several digital graphic pieces before in college, and for personal work.

Lastly, I also wanted to recreate my draft timeline storyboard to a digital version to make it look more professional (as seen below). As this is something I would love to do in the entertainment industry, I focused on the key spots of importance and illustrated the central level area locations. Overall, I have really enjoyed the experience of the practical making of a game using software that will not only help me in the new terms at University but for the future outside of higher education as well.