For our Games Art unit, we were asked to design a Triple A Asset prop of our choice. I had the initial idea of a gun as my object and set out to create a model from a film or game. After discovering that someone had modelled the two weapons I had in mind (one of them being from the sci-fi film District 9) I remembered back to a homework assignment from my first year at Uni; to create our own original gun design.

Above is the two-handed rifle I designed called FLARER based on a flower named the Hymenocallis. One of my main influences was a gun that opened up in the game Lost Planet 2. Here is a link to the post with more details on the structure.
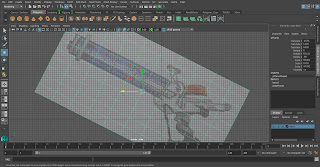
Once I had decided I was going to make the gun, the first thing I did was set up a new project. I created a reference image of the gun from the side view in proportion and scale compared to that of the average human hight.

Next, I began blocking out the form with a very useful tool called Quad Draw. This enables you to click out where you want your vertices and then by holding shift and left clicking over the centre of the four sides you can create a quad plane.

The Quad Draw feature was very helpful in building the basics quickly and effectively in the side view. I then just had to select all the faces and then extrude to bring out the body as I went.

By highlighting two edge loops that are not connected and selecting the bridge tool, you can create a curved path and are given settings like how many divisions you would like to add. I really think this is a fantastic instrument and its process is so quick as opposed to manually bridging two sides.

Above is the first handle grip I constructed. This was more like a temporary build before creating a smoothed shape later on.

A third of the gun (at the rear) is tilted diagonally which was one of the harder components to figure out. Once I had done all the major pieces, I then rotated the axis of the grouped items and also moved the reference image to match it horizontally.

For several parts like the back handle, I mirrored the geometry over on the opposite axis which was very helpful for time management.

At the base of the main body of the gun, there are several small external wires wrapping around to the side.

I made these wires using the curves tool in the surfaces tab. With this, all I had to do was click out the path of the line and then hit enter to actually make it an object in scene.

Furthermore, all I had to do was align a shape at one end of the curve, select both the curve and the
shapes face (in parallel with the line) then simply extrude. This then snaps the extruding face to the opposite end of the curve line. Finally, I increased the offset to make the form closer to the custom
curve with something like over thirty divisions.

To make the wires not look like they were just floating on the edge, I added a socket bar at the top and tidy clips down to the base.

Another great feature in Maya is the multi-cut tool. This enabled me to cut a straight line where I would not have been able to do so at an awkward angle in the centre of the gun.

The front top handle grip is attached to the loading column on the gun. When the user pulls backwards, the three arc 'petals' open forming the firing mode like a blooming flower opening up.

I used the Booleans Union tool to merge the spoke with the outer wall as seen above.

To allow the circular loading column to pivot I made a cylinder and extruding making a stop on the end for both sides; adding a sense of realism to the design.

All I had to do when I had finished the left side loading column and beam, was duplicate and align on the other side of the inner gun.

I really find the isolated selection view very useful when needing to work on a single component like above with the arc 'petals'. I also bevelled the end thin cube stand after connecting it to the shaft of the petals.

Around half way through, when I started on the front of the gun with the opening cylinder barrel, I realised how time consuming the next few processes were going to be. I actually attempted to write down a sort of work process to get through it efficiently. However, I spent too much time thinking the stages through and decided to just jump in on the modelling.

The central reason to why I took so long on this part was because I had to work using mathematical methods looking in all perspective views with the three hundred and sixty degree cylinder shape of the petals while making the gun feasible in 3D.

Above is the final smoothed handle grip with before on the right and after, with the trigger and base, on the left. I found the soft selection hot key ('B' on a keyboard) effective for tweaking certain areas while keeping the whole form in flow.

In the image here, I was at the last point of the major edits. Using the world and object move setting, I was able to eventually pivot and position the arc petals in place.

I kept the left side petal from the first to the final object part. It may not look like much has changed in the three pieces over time but I can pick out several sections that took me quite some time flipping between rotations in the x, y and z.

Above is an x-ray view of the front of the gun looking into the barrel to the back. I have included this because it depicts the interior panels and sector where I spent alot of time for the petals to open and display the arc front.

While making the three petals, I was double checking the opening mechanism and found a few flaws in my original sketches. In order to open out, like a flower blooming, I had to reconfigure the pivot points and how it translates on a diagonal axis; which was very difficult.

Above is my gun in the smoothing stage. I did not know what was the perfect high poly count for this as it was my first time and also my first time designing one of my own creations in 3D.

Here I have made a simple mental ray scene and rendered out from the perspective camera view. Something I did not notice when I was using the wireframe shaded view, was that some pieces were not as smooth or curved as I had thought.

Unfortunately, I could try and add edge loops into the parts with too little vertices but the result would take either too long or would distort the final object build.

The image previous and the one above, is a before and after shot of the gun arcing into firing mode. If I had more time on the project, I would have liked to have animated the opening petals and components to show the model in all its splendour.

Here is another angle of the gun, this time from the back almost in a first-person hand held composition. I really enjoyed editing the angles of light and shadow placement which I would love to experiment on in the future.

One of the next major stages was creasing all of the components I wished to divide and put detail on, later in the software ZBrush. Above is an early test of the UV Editor and a planar map just to see the UV faces etc.

In order to highlight key sections I wished to add surface detail too in ZBrush, I had to unwrap certain high poly model parts in Maya. Here is one of the smaller petal point parts that nicely came together after an automatic unwrap and repositioning in the layout.

Another exhausting process was checking all the edges and vertices, that seemed off in the smooth edge preview, for extra hidden non-sown points. I fixed these by merging the vertices or edges with the move and sew tool; of which I made a custom tool shelve icon for easy access.

The crease tool was also soon added to my custom tool shelve while excruciatingly going to each edge loop I wanted to keep hard edged after smoothing out the object.

So far I think this unit has been an amazing challenge to see if I can get a creation from my head, down on paper in 2D and then recreate it in 3D a year later! On the other hand, it was interesting to notice components from sketch not work in 3D and then have to model problem solve these into shapes like the moving parts in 3D; all aiding the realism of the gun.
No comments:
Post a Comment